3.4 使用 DataStream API 来处理数据 在 3.3 节中讲了数据转换常用的 Operators(算子),然后在 3.2 节中也讲了 Flink 中窗口的概念和原理,那么我们这篇文章再来细讲一下 Flink 中的各种 DataStream API。
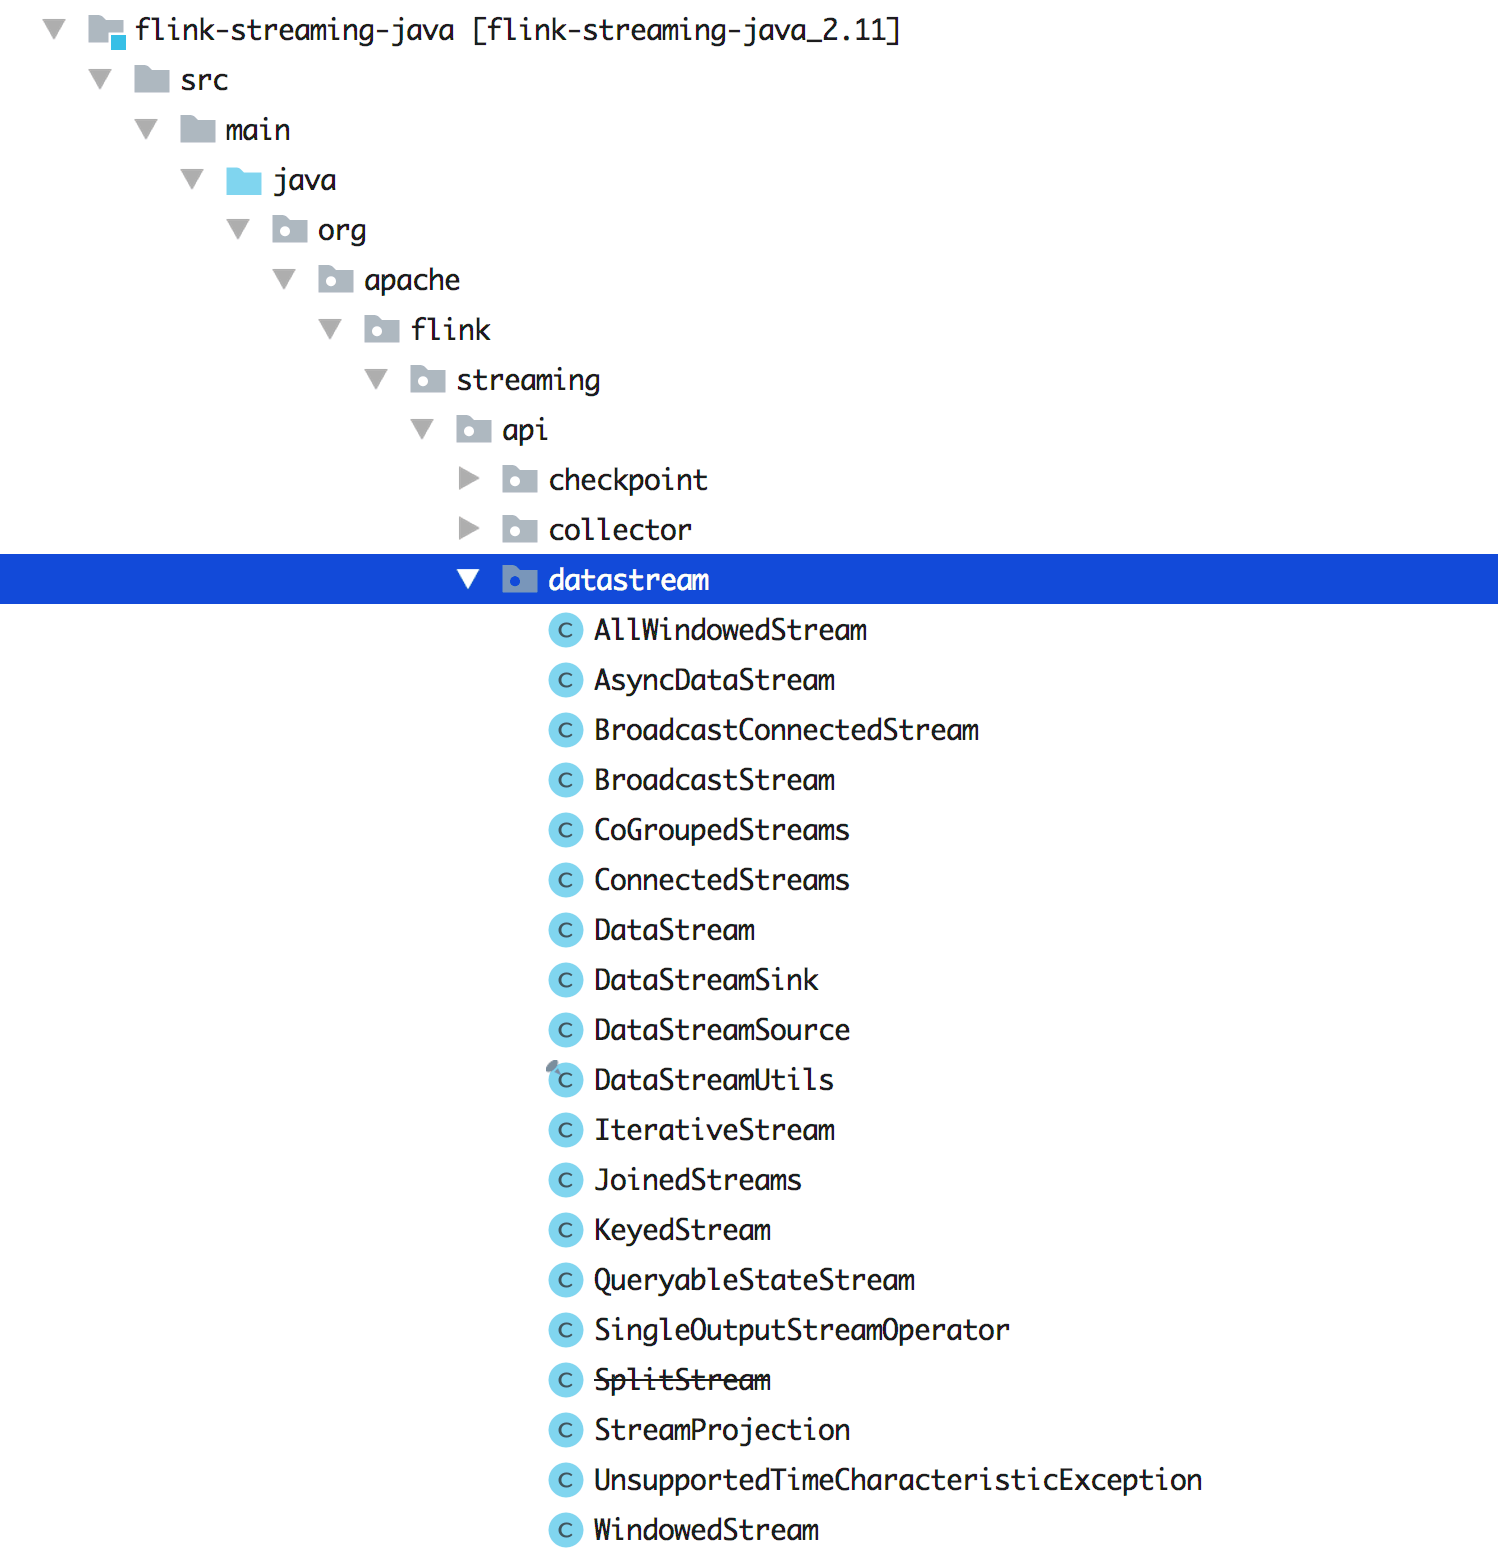
我们先来看下源码里面的 DataStream 大概有哪些类呢?如下图所示,展示了 1.9 版本中的 DataStream 类。
可以发现其实还是有很多的类,只有熟练掌握了这些 API,我们才能在做数据转换和计算的时候足够灵活的运用开来(知道何时该选用哪种 DataStream?选用哪个 Function?)。那么我们先从 DataStream 开始吧!
3.4.1 DataStream 的用法及分析 首先我们来看下 DataStream 这个类的定义吧:
1
2
A DataStream represents a stream of elements of the same type. A DataStreamcan be transformed into another DataStream by applying a transformation as DataStream#map or DataStream#filter}
大概意思是:DataStream 表示相同类型的元素组成的数据流,一个数据流可以通过 map/filter 等算子转换成另一个数据流。
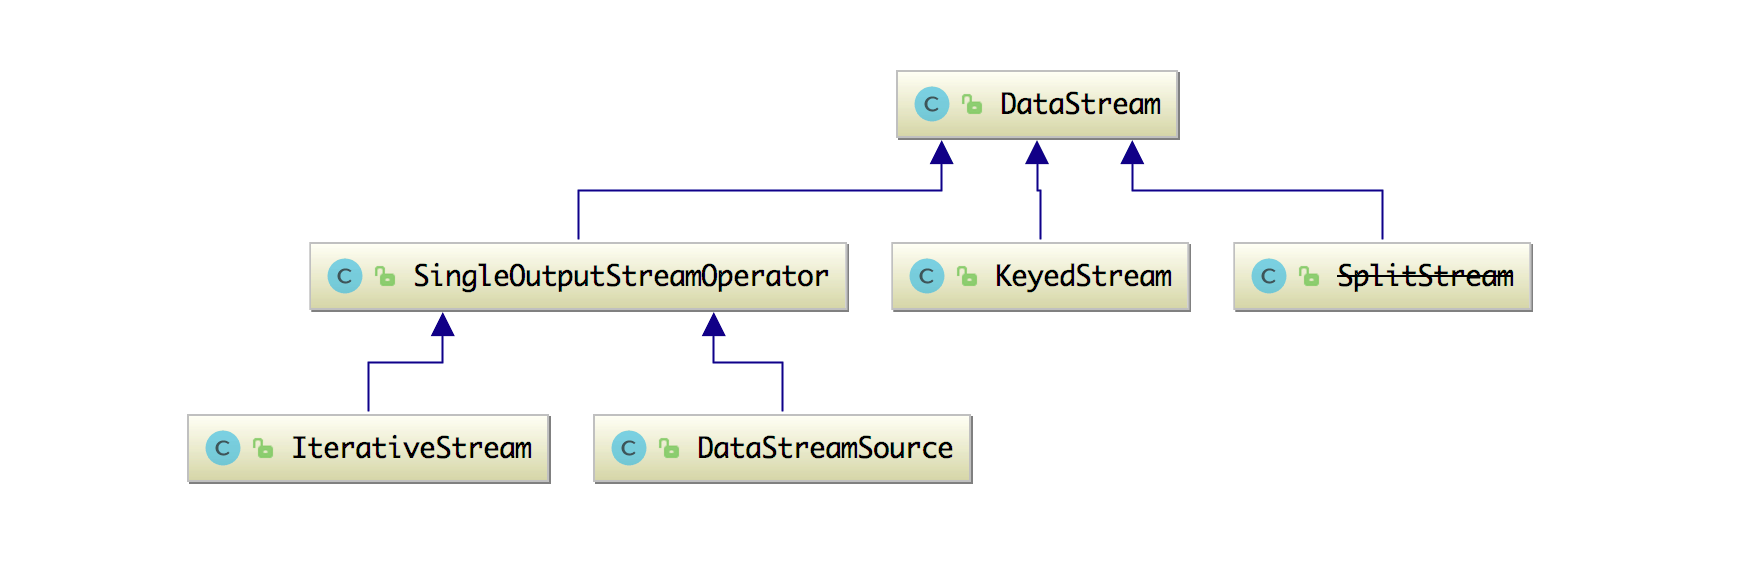
然后 DataStream 的类结构图如下图所示:
它的继承类有 KeyedStream、SingleOutputStreamOperator 和 SplitStream。这几个类本文后面都会一一给大家讲清楚。下面我们来看看 DataStream 这个类中的属性和方法吧。
它的属性就只有两个:
1
2
3
protected final StreamExecutionEnvironment environment;protected final StreamTransformation<T> transformation;
但是它的方法却有很多,并且我们平时写的 Flink Job 几乎离不开这些方法,这也注定了这个类的重要性,所以得好好看下这些方法该如何使用,以及是如何实现的。
union 通过合并相同数据类型的数据流,然后创建一个新的数据流,union 方法代码实现如下:
1
2
3
4
5
6
7
8
9
10
11
12
13
public final DataStream<T> union (DataStream<T>... streams) List<StreamTransformation<T>> unionedTransforms = new ArrayList<>(); unionedTransforms.add(this .transformation); for (DataStream<T> newStream : streams) { if (!getType().equals(newStream.getType())) { throw new IllegalArgumentException("Cannot union streams of different types: " + getType() + " and " + newStream.getType()); } unionedTransforms.add(newStream.getTransformation()); } return new DataStream<>(this .environment, new UnionTransformation<>(unionedTransforms)); }
那么我们该如何去使用 union 呢(不止连接一个数据流,也可以连接多个数据流)?
1 2 3 4 5 final DataStream<Integer> stream1 = env.addSource(...);final DataStream<Integer> stream2 = env.addSource(...);stream1.union(stream2)
split 该方法可以将两个数据流进行拆分,拆分后的数据流变成了 SplitStream(在下文会详细介绍这个类的内部实现),该 split 方法通过传入一个 OutputSelector 参数进行数据选择,方法内部实现就是构造一个 SplitStream 对象然后返回:
1
2
3
public SplitStream<T> split (OutputSelector<T> outputSelector) return new SplitStream<>(this , clean(outputSelector)); }
然后我们该如何使用这个方法呢?
1 2 3 4 5 6 7 8 9 10 11 12 13 14 dataStream.split(new OutputSelector<Integer>() { private static final long serialVersionUID = 8354166915727490130L ; @Override public Iterable<String> select (Integer value) List<String> s = new ArrayList<String>(); if (value > 4 ) { s.add(">" ); } else { s.add("<" ); } return s; } });
注意:该方法已经不推荐使用了!在 1.7 版本以后建议使用 Side Output 来实现分流操作。
connect 通过连接不同或相同数据类型的数据流,然后创建一个新的连接数据流,如果连接的数据流也是一个 DataStream 的话,那么连接后的数据流为 ConnectedStreams(会在下文介绍这个类的具体实现),它的具体实现如下:
1
2
3
public <R> ConnectedStreams<T, R> connect (DataStream<R> dataStream) { return new ConnectedStreams<>(environment, this , dataStream); }
如果连接的数据流是一个 BroadcastStream(广播数据流),那么连接后的数据流是一个 BroadcastConnectedStream(会在下文详细介绍该类的内部实现),它的具体实现如下:
1
2
3
4
5
public <R> BroadcastConnectedStream<T, R> connect (BroadcastStream<R> broadcastStream) { return new BroadcastConnectedStream<>( environment, this , Preconditions.checkNotNull(broadcastStream), broadcastStream.getBroadcastStateDescriptor()); }
使用如下:
1 2 3 4 5 6 7 8 9 DataStream<Tuple2<Long, Long>> src1 = env.fromElements(new Tuple2<>(0L , 0L )); DataStream<Tuple2<Long, Long>> src2 = env.fromElements(new Tuple2<>(0L , 0L )); ConnectedStreams<Tuple2<Long, Long>, Tuple2<Long, Long>> connected = src1.connect(src2); DataStream<Tuple2<Long, Long>> src1 = env.fromElements(new Tuple2<>(0L , 0L )); final BroadcastStream<String> broadcast = srcTwo.broadcast(utterDescriptor);BroadcastConnectedStream<Tuple2<Long, Long>, String> connect = src1.connect(broadcast);
keyBy keyBy 方法是用来将数据进行分组的,通过该方法可以将具有相同 key 的数据划分在一起组成新的数据流,该方法有四种(它们的参数各不一样):
1 2 3 4 5 6 7 8 9 10 11 12 13 14 15 16 17 18 19 20 21 22 23 24 25 26 27 28 29 30 31 public <K> KeyedStream<T, K> keyBy (KeySelector<T, K> key) { ... return new KeyedStream<>(this , clean(key)); } public <K> KeyedStream<T, K> keyBy (KeySelector<T, K> key, TypeInformation<K> keyType) { ... return new KeyedStream<>(this , clean(key), keyType); } public KeyedStream<T, Tuple> keyBy (int ... fields) if (getType() instanceof BasicArrayTypeInfo || getType() instanceof PrimitiveArrayTypeInfo) { return keyBy(KeySelectorUtil.getSelectorForArray(fields, getType())); } else { return keyBy(new Keys.ExpressionKeys<>(fields, getType())); } } public KeyedStream<T, Tuple> keyBy (String... fields) return keyBy(new Keys.ExpressionKeys<>(fields, getType())); } private KeyedStream<T, Tuple> keyBy (Keys<T> keys) return new KeyedStream<>(this , clean(KeySelectorUtil.getSelectorForKeys(keys, getType(), getExecutionConfig()))); }
如何使用呢:
1
2
3
4
5
6
7
8
9
10
11
12
13
14
15
16
17
18
19
20
21
22
23
24
25
26
27
28
29
30
31
DataStream<Event> dataStream = env.fromElements( new Event(1 , "zhisheng01" , 1.0 ), new Event(2 , "zhisheng02" , 2.0 ), new Event(3 , "zhisheng03" , 2.1 ), new Event(3 , "zhisheng04" , 3.0 ), new SubEvent(4 , "zhisheng05" , 4.0 , 1.0 ), ); dataStream.keyBy(new KeySelector<Event, Integer>() { @Override public Integer getKey (Event value) throws Exception return value.getId(); } }); dataStream.keyBy(new KeySelector<Event, Integer>() { @Override public Integer getKey (Event value) throws Exception return value.getId(); } }, Types.STRING); dataStream.keyBy(0 ); dataStream.keyBy("zhisheng01" , "zhisheng02" );
partitionCustom 使用自定义分区器在指定的 key 字段上将 DataStream 分区,这个 partitionCustom 有 3 个不同参数的方法,分别要传入的参数有自定义分区 Partitioner 对象、位置、字符和 KeySelector。它们内部也都是调用了私有的 partitionCustom 方法。
broadcast broadcast 是将数据流进行广播,然后让下游的每个并行 Task 中都可以获取到这份数据流,通常这些数据是一些配置,一般这些配置数据的数据量不能太大,否则资源消耗会比较大。这个 broadcast 方法也有两个,一个是无参数,它返回的数据是 DataStream;另一种的参数是 MapStateDescriptor,它返回的参数是 BroadcastStream(这个也会在下文详细介绍)。
使用方法:
1 2 3 4 5 6 7 8 9 10 DataStream<Tuple2<Integer, String>> source = env.addSource(...).broadcast(); final MapStateDescriptor<Long, String> utterDescriptor = new MapStateDescriptor<>( "broadcast-state" , BasicTypeInfo.LONG_TYPE_INFO, BasicTypeInfo.STRING_TYPE_INFO ); final DataStream<String> srcTwo = env.fromCollection(expected.values());final BroadcastStream<String> broadcast = srcTwo.broadcast(utterDescriptor);
map map 方法需要传入的参数是一个 MapFunction,当然传入 RichMapFunction 也是可以的,它返回的是 SingleOutputStreamOperator(这个类在会在下文详细介绍),该 map 方法里面的实现如下:
1
2
3
4
5
6
7
public <R> SingleOutputStreamOperator<R> map (MapFunction<T, R> mapper) { TypeInformation<R> outType = TypeExtractor.getMapReturnTypes(clean(mapper), getType(), Utils.getCallLocationName(), true ); return transform("Map" , outType, new StreamMap<>(clean(mapper))); }
该方法平时使用的非常频繁,然后我们该如何使用这个方法呢:
1 2 3 4 5 6 7 8 dataStream.map(new MapFunction<Integer, String>() { private static final long serialVersionUID = 1L ; @Override public String map (Integer value) throws Exception return value.toString(); } })
flatMap flatMap 方法需要传入一个 FlatMapFunction 参数,当然传入 RichFlatMapFunction 也是可以的,如果你的 Flink Job 里面有连续的 filter 和 map 算子在一起,可以考虑使用 flatMap 一个算子来完成两个算子的工作,它返回的是 SingleOutputStreamOperator,该 flatMap 方法里面的实现如下:
1
2
3
4
5
6
7
8
public <R> SingleOutputStreamOperator<R> flatMap (FlatMapFunction<T, R> flatMapper) { TypeInformation<R> outType = TypeExtractor.getFlatMapReturnTypes(clean(flatMapper), getType(), Utils.getCallLocationName(), true ); return transform("Flat Map" , outType, new StreamFlatMap<>(clean(flatMapper))); }
该方法平时使用的非常频繁,使用方式如下:
1 2 3 4 5 6 dataStream.flatMap(new FlatMapFunction<Integer, Integer>() { @Override public void flatMap (Integer value, Collector<Integer> out) throws Exception out.collect(value); } })
process 在输入流上应用给定的 ProcessFunction,从而创建转换后的输出流,通过该方法返回的是 SingleOutputStreamOperator,具体代码实现如下:
1
2
3
4
5
6
7
8
9
10
11
12
13
14
15
16
17
public <R> SingleOutputStreamOperator<R> process (ProcessFunction<T, R> processFunction) { TypeInformation<R> outType = TypeExtractor.getUnaryOperatorReturnType( processFunction, ProcessFunction.class, 0 , 1 , TypeExtractor.NO_INDEX, getType(), Utils.getCallLocationName(), true ); return process(processFunction, outType); } public <R> SingleOutputStreamOperator<R> process ( ProcessFunction<T, R> processFunction, TypeInformation<R> outputType) ProcessOperator<T, R> operator = new ProcessOperator<>(clean(processFunction)); return transform("Process" , outputType, operator); }
使用方法:
1
2
3
4
5
6
7
8
9
10
11
12
13
14
15
16
17
18
19
20
DataStreamSource<Long> data = env.generateSequence(0 , 0 ); ProcessFunction<Long, Integer> processFunction = new ProcessFunction<Long, Integer>() { private static final long serialVersionUID = 1L ; @Override public void processElement (Long value, Context ctx, Collector<Integer> out) throws Exception } @Override public void onTimer (long timestamp, OnTimerContext ctx, Collector<Integer> out) throws Exception } }; DataStream<Integer> processed = data.keyBy(new IdentityKeySelector<Long>()).process(processFunction);
filter filter 用来过滤数据的,它需要传入一个 FilterFunction,然后返回的数据也是 SingleOutputStreamOperator,该方法的实现是:
1
2
3
public SingleOutputStreamOperator<T> filter (FilterFunction<T> filter) return transform("Filter" , getType(), new StreamFilter<>(clean(filter))); }
该方法平时使用非常多:
1
2
3
4
5
6
7
DataStream<String> filter1 = src .filter(new FilterFunction<String>() { @Override public boolean filter (String value) throws Exception return "zhisheng" .equals(value); } })
上面这些方法是平时写代码时用的非常多的方法,我们这里讲解了它们的实现原理和使用方式,当然还有其他方法,比如 assignTimestampsAndWatermarks、join、shuffle、forward、addSink、rebalance、iterate、coGroup、project、timeWindowAll、countWindowAll、windowAll、print 等,这里由于篇幅的问题就不一一展开来讲了。
3.4.2 SingleOutputStreamOperator 的用法及分析 SingleOutputStreamOperator 这个类继承自 DataStream,所以 DataStream 中有的方法在这里也都有,那么这里就讲解下额外的方法的作用,如下。
name():该方法可以设置当前数据流的名称,如果设置了该值,则可以在 Flink UI 上看到该值;uid() 方法可以为算子设置一个指定的 ID,该 ID 有个作用就是如果想从 savepoint 恢复 Job 时是可以根据这个算子的 ID 来恢复到它之前的运行状态;
setParallelism() :该方法是为每个算子单独设置并行度的,这个设置优先于你通过 env 设置的全局并行度;
setMaxParallelism() :该为算子设置最大的并行度;
setResources():该方法有两个(参数不同),设置算子的资源,但是这两个方法对外还没开放(是私有的,暂时功能性还不全);
forceNonParallel():该方法强行将并行度和最大并行度都设置为 1;
setChainingStrategy():该方法对给定的算子设置 ChainingStrategy;
disableChaining():该这个方法设置后将禁止该算子与其他的算子 chain 在一起;
getSideOutput():该方法通过给定的 OutputTag 参数从 side output 中来筛选出对应的数据流。
3.4.3 KeyedStream 的用法及分析 KeyedStream 是 DataStream 在根据 KeySelector 分区后的数据流,DataStream 中常用的方法在 KeyedStream 后也可以用(除了 shuffle、forward 和 keyBy 等分区方法),在该类中的属性分别是 KeySelector 和 TypeInformation。
DataStream 中的窗口方法只有 timeWindowAll、countWindowAll 和 windowAll 这三种全局窗口方法,但是在 KeyedStream 类中的种类就稍微多了些,新增了 timeWindow、countWindow 方法,并且是还支持滑动窗口。
除了窗口方法的新增外,还支持大量的聚合操作方法,比如 reduce、fold、sum、min、max、minBy、maxBy、aggregate 等方法(列举的这几个方法都支持多种参数的)。
最后就是它还有 asQueryableState() 方法,能够将 KeyedStream 发布为可查询的 ValueState 实例。
3.4.4 SplitStream 的用法及分析 SplitStream 这个类比较简单,它代表着数据分流后的数据流了,它有一个 select 方法可以选择分流后的哪种数据流了,通常它是结合 split 使用的,对于单次分流来说还挺方便的。但是它是一个被废弃的类(Flink 1.7 后被废弃的,可以看下笔者之前写的一篇文章 Flink 从0到1学习—— Flink 不可以连续 Split(分流)? ),其实可以用 side output 来代替这种 split,后面文章中我们也会讲通过简单的案例来讲解一下该如何使用 side output 做数据分流操作。
因为这个类的源码比较少,我们可以看下这个类的实现:
1
2
3
4
5
6
7
8
9
10
11
12
13
14
15
16
17
18
19
20
21
22
23
24
25
public class SplitStream <OUT > extends DataStream <OUT > protected SplitStream (DataStream<OUT> dataStream, OutputSelector<OUT> outputSelector) super (dataStream.getExecutionEnvironment(), new SplitTransformation<OUT>(dataStream.getTransformation(), outputSelector)); } public DataStream<OUT> select (String... outputNames) return selectOutput(outputNames); } private DataStream<OUT> selectOutput (String[] outputNames) for (String outName : outputNames) { if (outName == null ) { throw new RuntimeException("Selected names must not be null" ); } } SelectTransformation<OUT> selectTransform = new SelectTransformation<OUT>(this .getTransformation(), Lists.newArrayList(outputNames)); return new DataStream<OUT>(this .getExecutionEnvironment(), selectTransform); } }
3.4.5 WindowedStream 的用法及分析 虽然 WindowedStream 不是继承自 DataStream,并且我们在 3.1 节中也做了一定的讲解,但是当时没讲里面的 Function,所以在这里刚好一起做一个补充。
在 WindowedStream 类中定义的属性有 KeyedStream、WindowAssigner、Trigger、Evictor、allowedLateness 和 lateDataOutputTag。
KeyedStream:代表着数据流,数据分组后再开 Window
WindowAssigner:Window 的组件之一
Trigger:Window 的组件之一
Evictor:Window 的组件之一(可选)
allowedLateness:用户指定的允许迟到时间长
lateDataOutputTag:数据延迟到达的 Side output,如果延迟数据没有设置任何标记,则会被丢弃
在 3.1 节中我们讲了上面的三个窗口组件 WindowAssigner、Trigger、Evictor,并教大家该如何使用,那么在这篇文章我就不再重复,那么接下来就来分析下其他几个的使用方式和其实现原理。
先来看下 allowedLateness 这个它可以在窗口后指定允许迟到的时间长,使用如下:
1 2 3 dataStream.keyBy(0 ) .timeWindow(Time.milliseconds(20 )) .allowedLateness(Time.milliseconds(2 ))
lateDataOutputTag 这个它将延迟到达的数据发送到由给定 OutputTag 标识的 side output(侧输出),当水印经过窗口末尾(并加上了允许的延迟后),数据就被认为是延迟了。
对于 keyed windows 有五个不同参数的 reduce 方法可以使用,如下:
1 2 3 4 5 6 7 8 9 10 11 12 13 14 15 16 17 18 19 20 21 22 23 24 25 26 27 28 29 public SingleOutputStreamOperator<T> reduce (ReduceFunction<T> function) ... return reduce(function, new PassThroughWindowFunction<K, W, T>()); } public <R> SingleOutputStreamOperator<R> reduce (ReduceFunction<T> reduceFunction, WindowFunction<T, R, K, W> function) { ... return reduce(reduceFunction, function, resultType); } public <R> SingleOutputStreamOperator<R> reduce (ReduceFunction<T> reduceFunction, WindowFunction<T, R, K, W> function, TypeInformation<R> resultType) { ... return input.transform(opName, resultType, operator); } public <R> SingleOutputStreamOperator<R> reduce (ReduceFunction<T> reduceFunction, ProcessWindowFunction<T, R, K, W> function) { ... return reduce(reduceFunction, function, resultType); } public <R> SingleOutputStreamOperator<R> reduce (ReduceFunction<T> reduceFunction, ProcessWindowFunction<T, R, K, W> function, TypeInformation<R> resultType) { ... return input.transform(opName, resultType, operator); }
除了 reduce 方法,还有六个不同参数的 fold 方法、aggregate 方法;两个不同参数的 apply 方法、process 方法(其中你会发现这两个 apply 方法和 process 方法内部其实都隐式的调用了一个私有的 apply 方法);其实除了前面说的两个不同参数的 apply 方法外,还有四个其他的 apply 方法,这四个方法也是参数不同,但是其实最终的是利用了 transform 方法;还有的就是一些预定义的聚合方法比如 sum、min、minBy、max、maxBy,它们的方法参数的个数不一致,这些预聚合的方法内部调用的其实都是私有的 aggregate 方法,该方法允许你传入一个 AggregationFunction 参数。我们来看一个具体的实现:
1 2 3 4 5 6 7 8 9 10 11 12 13 14 15 16 17 18 public SingleOutputStreamOperator<T> max (String field) return aggregate(new ComparableAggregator<>(field, input.getType(), AggregationFunction.AggregationType.MAX, false , input.getExecutionConfig())); } private SingleOutputStreamOperator<T> aggregate (AggregationFunction<T> aggregator) return reduce(aggregator); } public SingleOutputStreamOperator<T> reduce (ReduceFunction<T> function) ... function = input.getExecutionEnvironment().clean(function); return reduce(function, new PassThroughWindowFunction<K, W, T>()); }
从上面的方法调用过程,你会发现代码封装的很深,得需要你自己好好跟一下源码才可以了解更深些。
上面讲了这么多方法,你会发现 reduce 方法其实是用的蛮多的之一,那么就来看看该如何使用:
1 2 3 4 5 6 7 8 9 dataStream.keyBy(0 ) .window(TumblingEventTimeWindows.of(Time.seconds(5 ))) .reduce(new ReduceFunction<Tuple2<String, Integer>>() { @Override public Tuple2<String, Integer> reduce (Tuple2<String, Integer> value1, Tuple2<String, Integer> value2) return value1; } }) .print();
3.4.6 AllWindowedStream 的用法及分析 前面讲完了 WindowedStream,再来看看这个 AllWindowedStream 你会发现它的实现其实无太大区别,该类中的属性和方法都和前面 WindowedStream 是一样的,然后我们就不再做过多的介绍,直接来看看该如何使用呢?
AllWindowedStream 这种场景下是不需要让数据流做 keyBy 分组操作,直接就进行 windowAll 操作,然后在 windowAll 方法中传入 WindowAssigner 参数对象即可,然后返回的数据结果就是 AllWindowedStream 了,下面使用方式继续执行了 AllWindowedStream 中的 reduce 方法来返回数据:
1 2 3 4 5 6 7 8 9 10 dataStream.windowAll(SlidingEventTimeWindows.of(Time.of(1 , TimeUnit.SECONDS), Time.of(100 , TimeUnit.MILLISECONDS))) .reduce(new RichReduceFunction<Tuple2<String, Integer>>() { private static final long serialVersionUID = -6448847205314995812L ; @Override public Tuple2<String, Integer> reduce (Tuple2<String, Integer> value1, Tuple2<String, Integer> value2) throws Exception return value1; } });
3.4.7 ConnectedStreams 的用法及分析 ConnectedStreams 这个类定义是表示(可能)两个不同数据类型的数据连接流,该场景如果对一个数据流进行操作会直接影响另一个数据流,因此可以通过流连接来共享状态。比较常见的一个例子就是一个数据流(随时间变化的规则数据流)通过连接其他的数据流,这样另一个数据流就可以利用这些连接的规则数据流。
ConnectedStreams 在概念上可以认为和 Union 数据流是一样的。
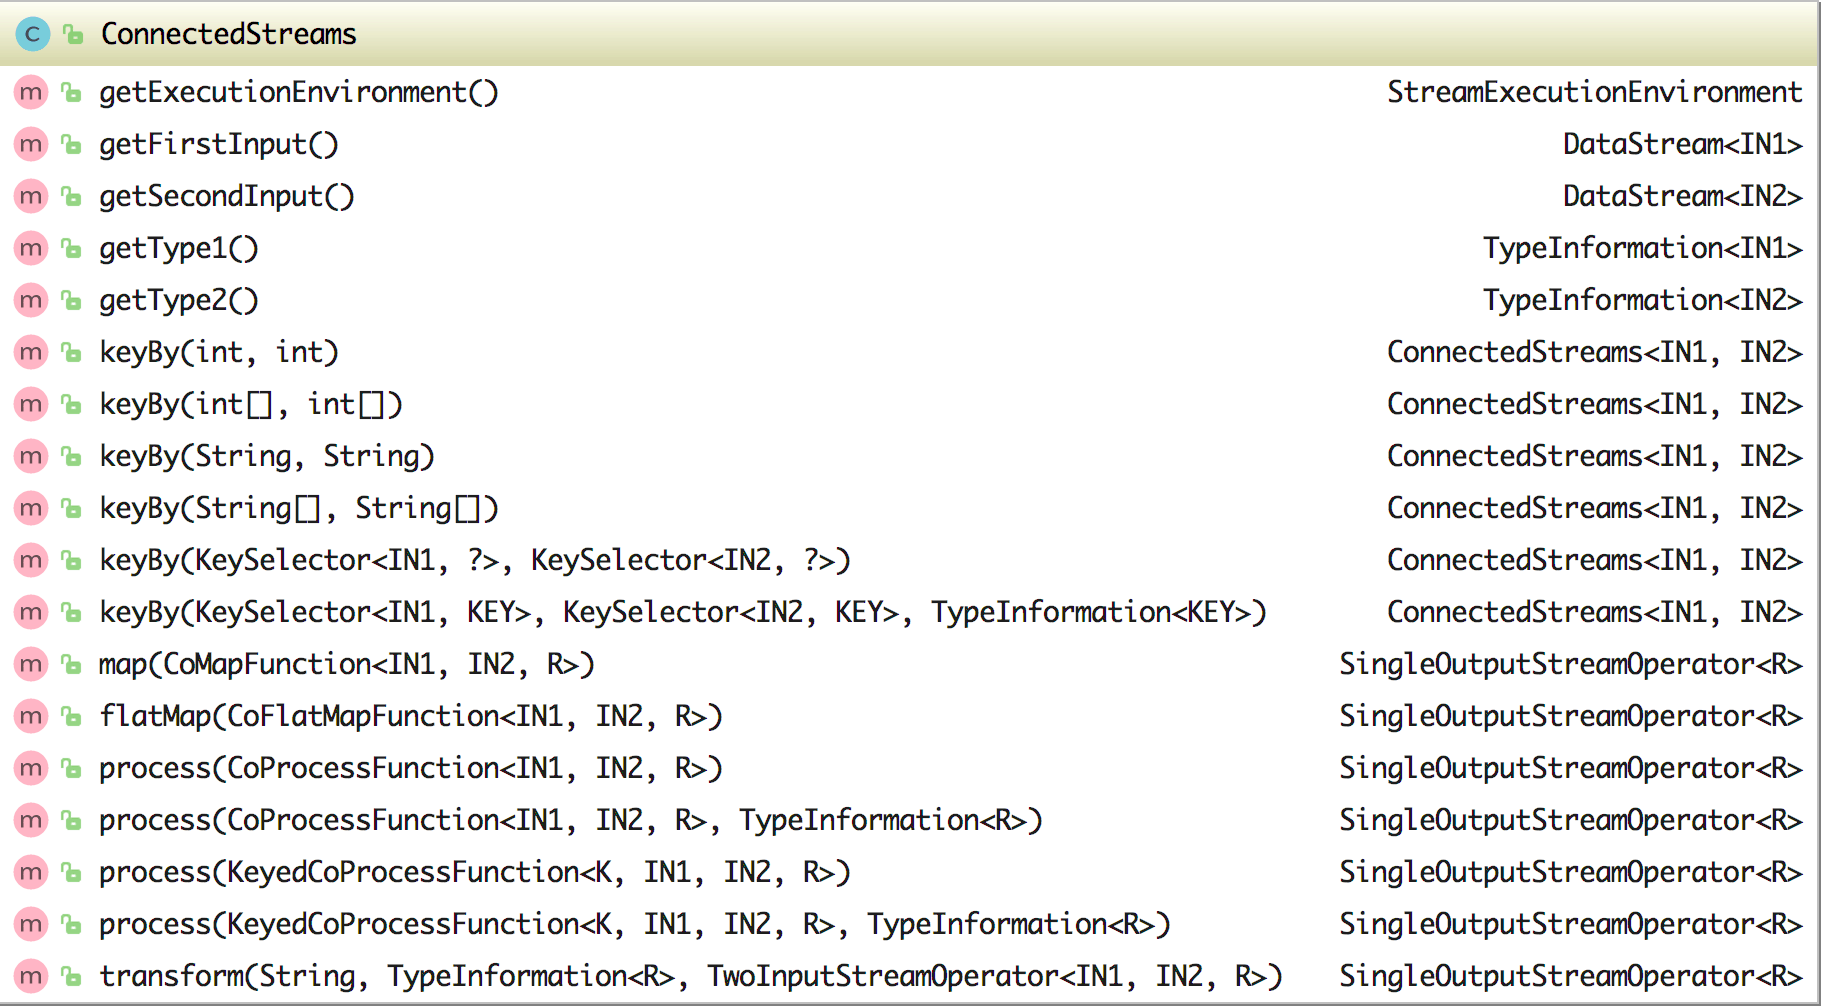
在 ConnectedStreams 类中有三个属性:environment、inputStream1 和 inputStream2,该类中的方法如下图所示:
在 ConnectedStreams 中可以通过 getFirstInput 获取连接的第一个流、通过 getSecondInput 获取连接的第二个流,同时它还含有六个 keyBy 方法来将连接后的数据流进行分组,这六个 keyBy 方法的参数各有不同。另外它还含有 map、flatMap、process 方法来处理数据(其中 map 和 flatMap 方法的参数分别使用的是 CoMapFunction 和 CoFlatMapFunction),其实如果你细看其方法里面的实现就会发现都是调用的 transform 方法。
上面讲完了 ConnectedStreams 类的基础定义,接下来我们来看下该类如何使用呢?
1
2
3
4
5
6
7
8
9
10
11
12
13
14
15
16
17
18
19
20
21
22
23
24
25
26
27
28
29
30
31
32
33
34
35
36
37
38
39
40
41
42
43
44
45
46
47
48
49
50
51
52
53
54
55
56
DataStream<Tuple2<Long, Long>> src1 = env.fromElements(new Tuple2<>(0L , 0L )); DataStream<Tuple2<Long, Long>> src2 = env.fromElements(new Tuple2<>(0L , 0L )); ConnectedStreams<Tuple2<Long, Long>, Tuple2<Long, Long>> connected = src1.connect(src2); ConnectedStreams<Tuple2<Long, Long>, Tuple2<Long, Long>> connectedGroup1 = connected.keyBy(0 , 0 ); ConnectedStreams<Tuple2<Long, Long>, Tuple2<Long, Long>> connectedGroup2 = connected.keyBy(new int []{0 }, new int []{0 }); ConnectedStreams<Tuple2<Long, Long>, Tuple2<Long, Long>> connectedGroup3 = connected.keyBy("f0" , "f0" ); ConnectedStreams<Tuple2<Long, Long>, Tuple2<Long, Long>> connectedGroup4 = connected.keyBy(new String[]{"f0" }, new String[]{"f0" }); ConnectedStreams<Tuple2<Long, Long>, Tuple2<Long, Long>> connectedGroup5 = connected.keyBy(new FirstSelector(), new FirstSelector()); ConnectedStreams<Tuple2<Long, Long>, Tuple2<Long, Long>> connectedGroup5 = connected.keyBy(new FirstSelector(), new FirstSelector(), Types.STRING); connected.map(new CoMapFunction<Tuple2<Long, Long>, Tuple2<Long, Long>, Object>() { private static final long serialVersionUID = 1L ; @Override public Object map1 (Tuple2<Long, Long> value) return null ; } @Override public Object map2 (Tuple2<Long, Long> value) return null ; } }); connected.flatMap(new CoFlatMapFunction<Tuple2<Long, Long>, Tuple2<Long, Long>, Tuple2<Long, Long>>() { @Override public void flatMap1 (Tuple2<Long, Long> value, Collector<Tuple2<Long, Long>> out) throws Exception @Override public void flatMap2 (Tuple2<Long, Long> value, Collector<Tuple2<Long, Long>> out) throws Exception }).name("testCoFlatMap" ) connected.process(new CoProcessFunction<Tuple2<Long, Long>, Tuple2<Long, Long>, Tuple2<Long, Long>>() { @Override public void processElement1 (Tuple2<Long, Long> value, Context ctx, Collector<Tuple2<Long, Long>> out) throws Exception if (value.f0 < 3 ) { out.collect(value); ctx.output(sideOutputTag, "sideout1-" + String.valueOf(value)); } } @Override public void processElement2 (Tuple2<Long, Long> value, Context ctx, Collector<Tuple2<Long, Long>> out) throws Exception if (value.f0 >= 3 ) { out.collect(value); ctx.output(sideOutputTag, "sideout2-" + String.valueOf(value)); } } });
3.4.8 BroadcastStream 的用法及分析 3.4.9 BroadcastConnectedStream 的用法及分析 3.4.10 QueryableStateStream 的用法及分析 3.4.11 小结与反思 加入知识星球可以看到上面文章:https://t.zsxq.com/fy3RnMv